 create new ticket
 check ticket status
Our new integration with Google Adwords uses the Google Ads API to push Clicks to match against conversions, more information on this can be found here:
https://developers.google.com/google-ads/api/docs/start
https://developers.google.com/google-ads/api/docs/conversions/upload-clicks
https://developers.google.com/google-ads/api/docs/conversions/overview
If you are looking for information on the difference between the new and the old integrations more information can be found at:
https://developers.google.com/google-ads/api/docs/migration/services
Before you start, to use click conversions you must enable auto-tagging with your AdWords Account so that the Google Click ID (GCLID) can be used to push conversion back into AdWords. To see how to check if auto-tagging is enabled please click here.
The first step is done in your Google Adwords account, you must create a conversion measurement, Google has a guide on this in the above links but steps are also provided below:
1. Click on 'Tools & Settings' then under measurement click 'Conversions'

2. Click the blue '+' symbol and then add a conversion like below:

3. The settings on this next page are up to you but take note of the Conversion Name, this conversion name is to be inputted in a later step:

4. You now need to setup the integration in the integrations page:
5. You will need to input your Google Adwords account credentials to create a link, you can unlink this as anytime if you no longer wish for the integration to be active. This link should also be established with an account which isn't deactivated, if the account is deactivated the sync will not work.
Please note that if you are managing Adwords on behalf of your clients you will sign in with your credentials at this step.
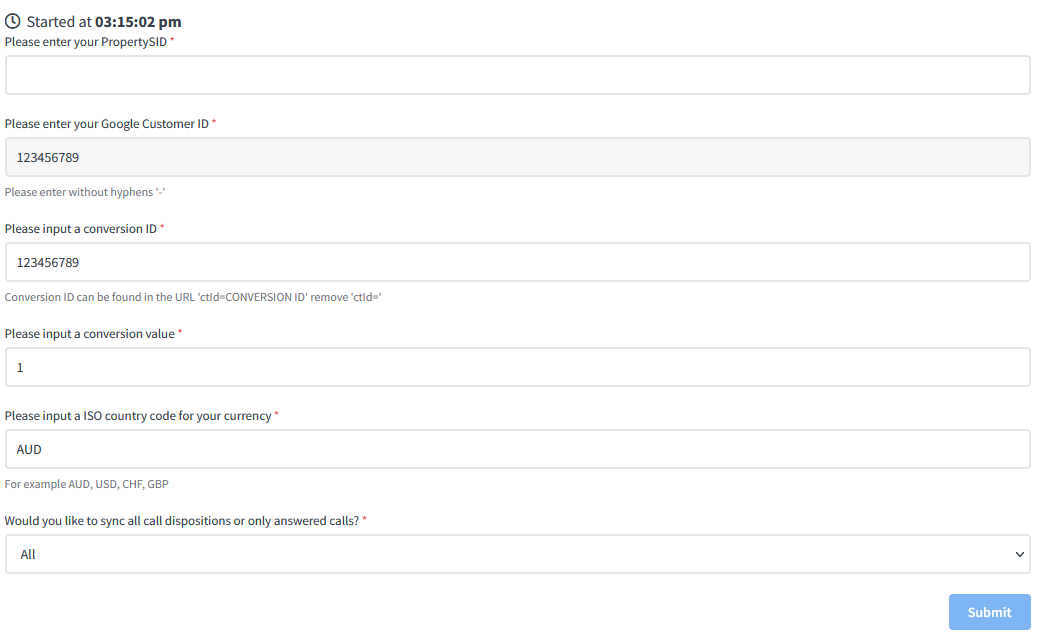
6. You must then enter the following settings:
- PropertySID - This is unique per project under your account, if you aren't sure what this is please contact us.
- Your Google Customer ID - Can be found on your Google Account, please let us know if you are using a sub-account. This needs to be entered WITHOUT the hyphens '-'.
If you are managing Adwords on behalf of your clients and you used your credentials in the previous step you will need to input your Google master account number here and not your customers.
- Call Disposition - Usually only answered calls would count as a conversion.
- Conversion Action ID - This conversion ID must match the conversion you want to sync against in Google Adwords, the ID for the conversion can be found by clicking on the conversion and checking the URL for 'ctId=' the following string of numbers is the ID you need to enter here.
- Conversion Value - If you didn't input a default conversion value on the previous step you can add one here. Please note this value must be 1 or greater, entering 0 will cause Google to treat the conversion as null and discard it.
- ISO Country Code - Corresponds to the conversion value, default is 'AUD' (without '' as shown below).
After clicking 'Next' you should now be integrated into Google Adwords, below is a guide on how to report on those conversion within Google Adwords as well as a general FAQ for this integration.
- How often does the data sync?
The integration will run every 30 minutes but Google Adwords requires events to be at minimum 24 hours to process the event so only calls from the previous day will be synced.
Reporting on Conversions in Adwords
Setting up Custom Columns
Step 1
Log into AdWords and click on the Campaigns tab on the left hand side bar.
Step 2
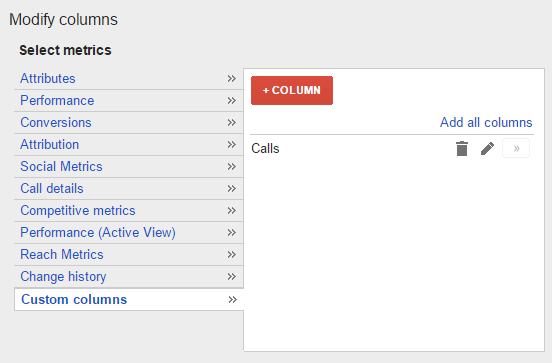
Click on Columns then click on Modify Columns.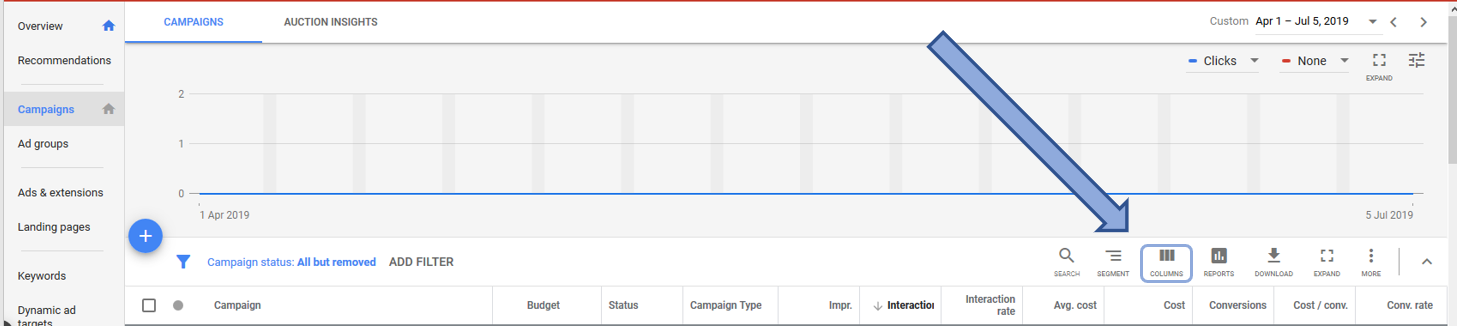
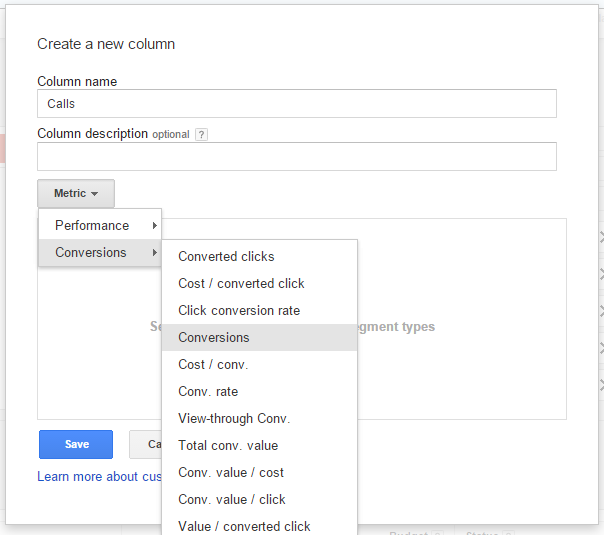
Step 3
Click on Custom Columns and click New Column.


Step 4 - Calls Column
Label your Column, add the conversion metric

Step 5
In the pop-up window that opens, name the column Calls and in the Metric drop down list select Conversions -> Conversions.
Step 6
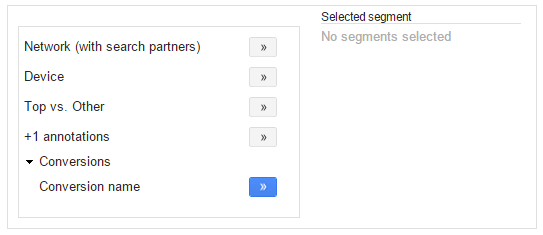
Click the triangle to the left of Conversions. Then click the button to add Conversion name to the Selected segment area.

Step 7
In the Selected segment area tick the box next to Call Tracking and then click Save.

Step 8
Click on the + Column button to add a new column.
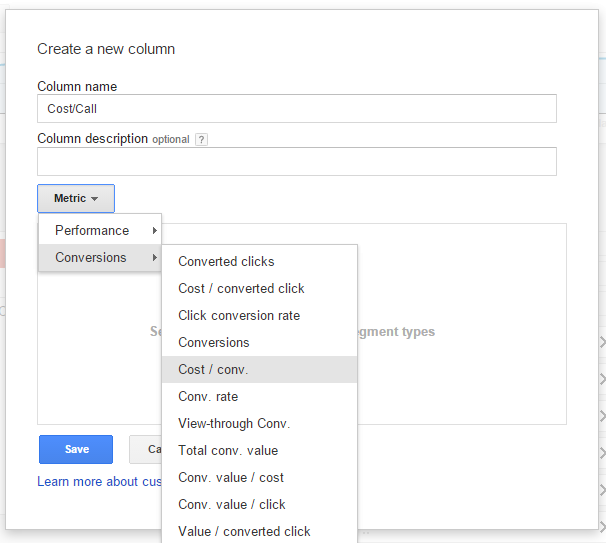
Step 9
In the pop-up window that opens, name the column Cost/Call and in the Metric drop down list select Conversions -> Cost / conv.
Step 10
Click the triangle to the left of Conversions. Then click the button to add Conversion name to the Selected segment area.
Step 11
In the Selected segment area tick the box next to Call Tracking and then click Save.

Step 12
Add one final column by clicking on the + Column button.

Step 13
In the pop-up window that opens, name the column Call % and in the Metric drop down list select Conversions -> Conv. rate

Step 14
Click the triangle to the left of Conversions. Then click the button to add Conversion name to the Selected segment area.

Step 15
In the Selected segment area tick the box next to Call Tracking and then click Save.

Step 16
Finally make sure that all of the new columns have been added to the list on the right to ensure they will be added to your table. If not click on the >> next to the columns that are missing. Click Apply to add these new columns.

Step 17
You should now see your new columns added to the end of your data table.
